• About

Me Myself & Riggins

~ The activities and adventures of Riggins and me!

Me Myself & Riggins

Tag Archives: crafts

Boo-tiful Dinner Party Table

28 Monday Oct 2013

Posted by wendynewell in Uncategorized

≈ 1 Comment

Tags

beer, Buddha, candles, crafts, dinner party, Halloween, Lucky Beer, table setting, wine

photo 1My Halloween table runner has been sitting under my TV since I sewed it.  I’m in that room everyday (watching TV) so it is a good place to put it to let me get the most enjoyment out of it.  A couple of days (weeks) ago I was having a few friends over for a casual dinner and I thought it would be the perfect time to use the runner.  Then I thought it was a great time to use the beer bottles I’d be saving (and as an extra bonus get rid).  That is how the most boo-tiful of all dinner party tables came to be!

Runner – Here is how you can make this 10 minute runner.

Buddha Beer (actually called Lucky Beer) – I found this great beer on sale at Vons.  I’m not a big beer drinker and never purchase beer unless it is for a party but how could I pass these up?  The bottles are shaped like the Buddha!  That’s brilliant!  I love them so much and figured they would make perfect flower vases.  Then I came up on the problem … what photo 2do you do with 6 tiny flower vases shaped like Buddha?  You add them to your dinner table and hand them to each guest as they leave.  How does it taste?  I don’t know … like beer.  It’s a light beer that real beer drinkers wouldn’t be that impressed by but I like it.  The beer is made in Mexico so I suppose it is kinda like Corona Light-ish.

Spooky Wine – I was getting flower for the Buddha Beer vases at Trader Joe’s when I saw this wine.  The wine dude asked if I needed any help pairing wine with my dinner.  Who does that?  I’m pairing the label to my table theme!  Honestly the wine wasn’t great but it was only six bucks (probably why it wasn’t that great) and looked perfect.  It’s also screw top which is my favorite.  I plan to start a petition that demands all wine is screw top vs. cork.  If you want a bigger selection of Halloween themed wine/beer/etc. I suggest going to Cost Plus World Market.  I was there recently to get a friend a birthday present and I spent a long time wandering up and down the Halloween themed aisles just wishing I had a reason to purchase everything.

Candles – I used individual candles because I couldn’t find any suitable big candle holders.  There were fun and are currently upside down in my freezer so I can pop out the dead candle goop.

There you go!  Happy Halloween week to you!

Pass it on:

  • Email
  • Facebook
  • Twitter
  • Pinterest
  • More
  • LinkedIn

Like this:

Like Loading...

Quote

Grown Up Friendship Bracelets

13 Friday Sep 2013

Posted by wendynewell in Uncategorized

≈ 3 Comments

Tags

bracelet, charms, crafts, cross stitch, friends, gifts

photo (12)Remember when you were a teenager and you could make a zillion of those friendship bracelets and wear them stacked on your wrist.  That was the best!  Yesterday I had a ton of stuff to do but instead of doing any of that I went to Michaels and purchased some charms so I could make grown up friendship bracelets for my friends that I was going to see that evening.  It was a very productive use of my time.  I originally got the idea from this Pinterest post … here.

They are as simple to make as you would think.  Although there was still a good amount of cursing on my part when things went wrong.  Here is what you do:

* Cut two pieces of floss 13 inches each (embroidery floss not teeth floss).  The Pinterest post says 18 which is ludicrous.  That length isn’t necessary unless you are making these for you elephant friend. (For those paying attention you will notice that my bracelet colors just happen to be the same as my last cross stitch colors.  Use what you already have I say!)

* Grab a circle charm (at first I hated the charms with groves on them but they actually work better by keeping the floss in place when they are on your wrist).

* Attach one floss piece around one side (loop, over, under, through) and then do the same thing on the other side.

* Grab a couple of beads.  I used ones I had left over from other projects (One of my bracelets didn’t have beads at the end.  Mistake.  That bracelet is already off my arm.  Use the beads even though the Pinterest site says “optional.”)

image (14)Thread the two ends through the bead and tie a knot on the end.  To make this easier I took a piece of wire, folded it in 1/2 and used it to help “thread” the bead.

* Wrap your beautiful bracelet around your wrist and tie a knot.  That’s right.  I said knot.  These are on until you cut them off or they fall off naturally.  You want them pretty tight so they don’t wiggle around too much.

I’m fancy so I made a set of three per person.  You can tie them on individually or as a set.  Individually is easier while as a set helps keep the charms in place.

Cute, fun, easy gifts!  Now I gotta go do those things I was avoiding yesterday!  Have a good weekend.

Pass it on:

  • Email
  • Facebook
  • Twitter
  • Pinterest
  • More
  • LinkedIn

Like this:

Like Loading...

More Unnecessary Tutorials – Birds and Shoes

09 Monday Sep 2013

Posted by wendynewell in Uncategorized

≈ 2 Comments

Tags

Asscher, ballerina slippers, bar method, bird cage, crafts

photo (9)In an effort to share some “how-tos” with you I’ve come to the conclusion that I do some really easy things that don’t need explaining.  Oh well … perhaps you got dropped on the head as a child and can’t figure these things out on your own and this blog is where you go for such obvious tutorials.   If that is true … read on …

Birdie Cage – Years ago I saw the most marvelous thing on Etsy.   A very talented woman had handmade bird cages with tons of colorful birds in it.  I NEEDED one to hang in my living room.  Alas her bird cages were actually hanging lights and I didn’t need the light part.  (They looked something, and yet nothing, like this – click here.  The woman I had seen years ago doesn’t seem to be selling them anymore.  This one is somewhat ridiculous.  Look at those birds!  Those birds are clinging sideways to that “cage” for dear life.)  At that moment I decided I’d make one myself.  Years of searching for the perfect “cage” came to an end at the clearance aisle of Target earlier this year.  I had FINALLY found the perfect cage.  It was actually a candle holder but it was bird cage-like so I was good with it.  It was tiny, like I wanted, it was all black and not distressed, like I wanted, it was practically perfect in every way!  It was the Mary Poppins of faux bird cages!

image (21)It took me a few months but I finally went to Michaels and bought some colorful birdies and a fake branch thing.  When I got home it took mere minutes to put it together.  The branch I had purchased had wire in it so it was easy to clip off the amount I needed for each perch and twist the ends around the cage to hold it in place.  All that was left was to clip on the little birds and hang it up!

It sat in my dinning room for months but this weekend I found a hook and some ribbon (that I had to pry out of Asscher’s jaw earlier in the week) and I got it hung up in the living room.  TADA!

Ballerina Slippers – As you know I use ballerina slippers in Bar Method class.  As you also know I bought a new pair earlier this year and they have been sitting on my chest of drawers mocking me.  My new pair required me to sew the straps on and that seemed so tedious and awful.  Everyday last week, while in class, I was horrified at the shabbiness of my shoes.  They were not ballerina perfect!  It was what I needed to kick myself in the bum and get my work done.

Last night I grabbed the shoes and was ready to make it happen.  Then I thought I shouldphoto (10) probably look up how others do it to make sure I was sewing correctly.  Whoa …. my mind was blown by what I learned.  Now I want to pass that knowledge on to you!

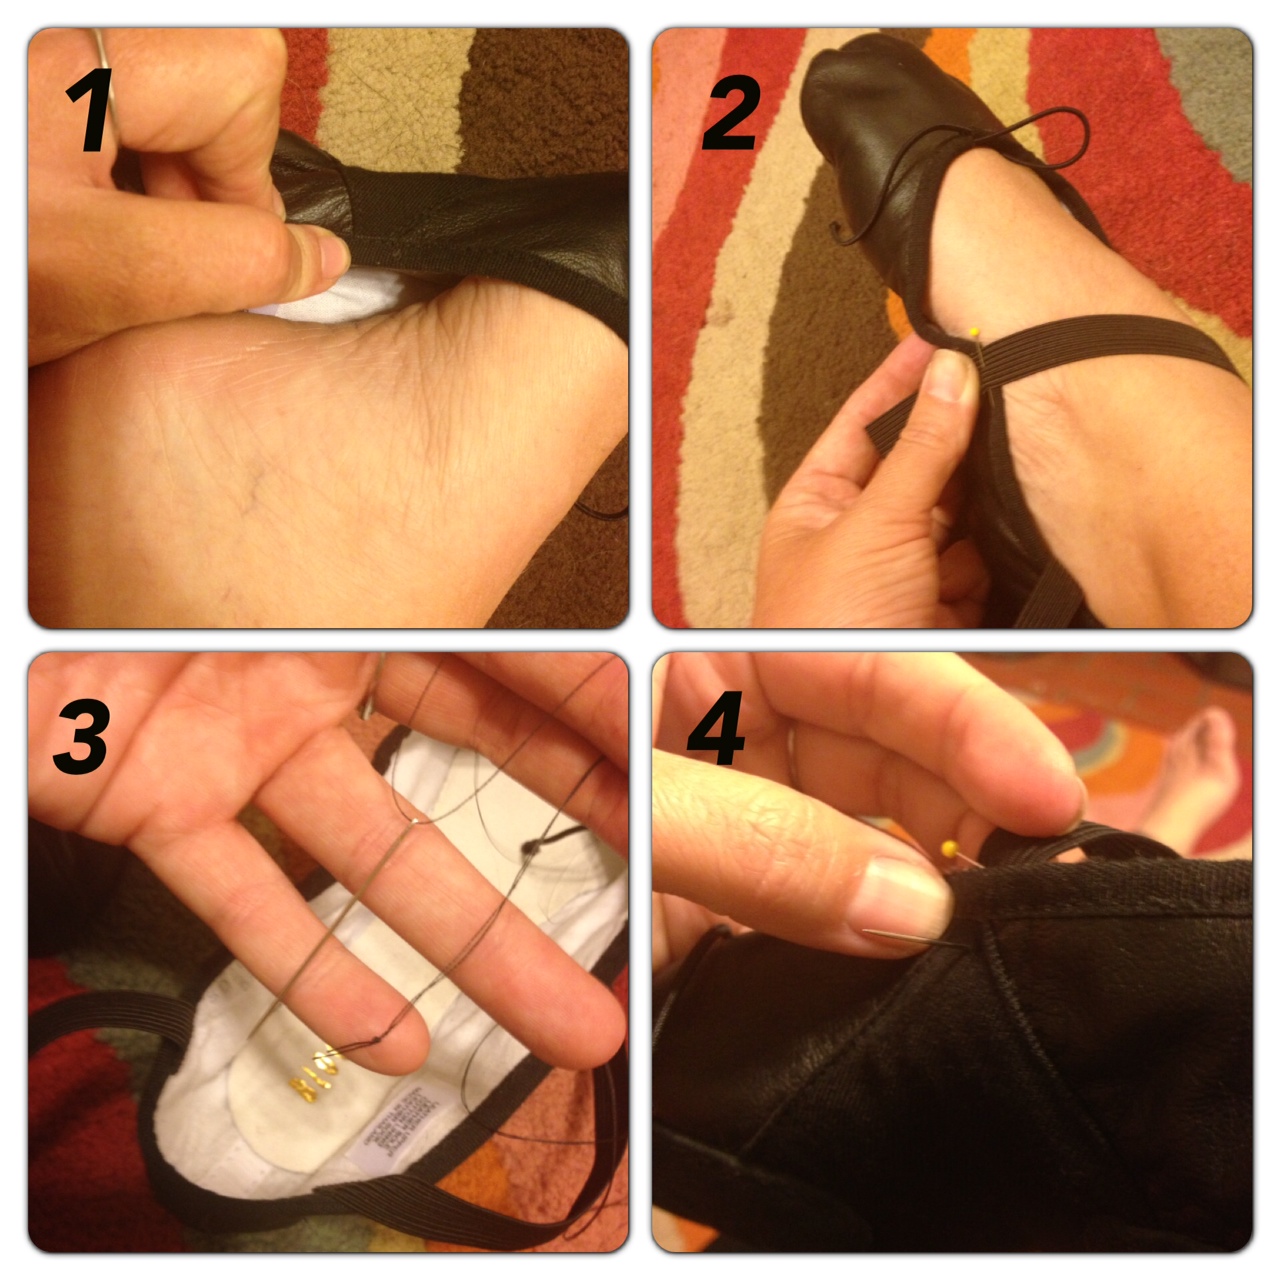
1. Put the slippers on your feet and find where the shoe lines up with the highest part of your arch.  My slippers are fancy and actually have different fabric in that area so I did not need to mark the spot.  If your shoes aren’t as cool as mine you will have to mark each side of the shoe at that spot with a pin.

2.  Pull the straps over tight, but not too tight, and mark where they should be attached with a pin.

3.  Grab some needle and thread.  Double knot for safety.

4.  Sew the strap on below the cinch line edge.  Go one way, and then go back over it the image (19)other way for safety.  Unless you are me and your thread breaks so one of the sides of one shoe is only done 1 1/2 times instead of 2.  Also be careful not to wrap the thread around the elastic band while sewing.  Don’t laugh.  It’s easier to do than you would expect.  Personally I had to start the same side 3 times for this very reason.

5.  Put the shoes back on to make sure they fit and you didn’t screw up.

6.  Cut off the excess elastic.

7.  Put the shoe back on and cinch it up so it is comfortably tight on your feet.

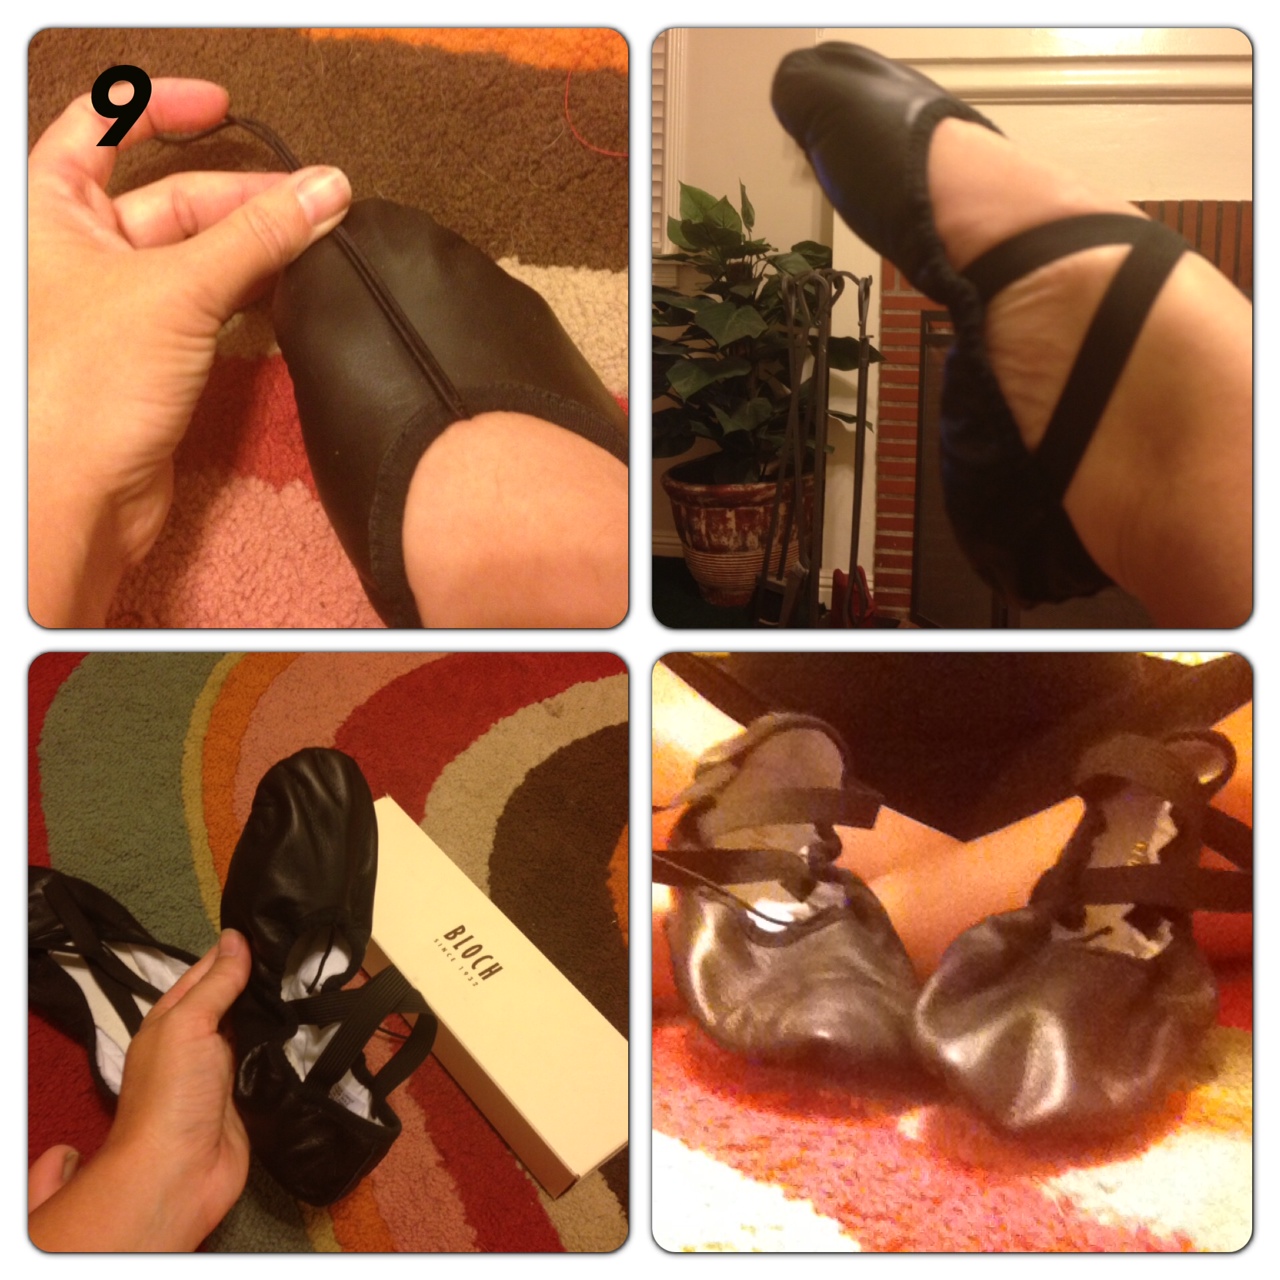
Time out – for YEARS I’ve been wearing ballerina slippers to class and have been tying the cinch strings in a bow on the top of the shoe.  It’s annoying.  The bow constantly comes out in the middle of class and you look like a moron who doesn’t know anything about ballet.  I knew I was doing something wrong but then I’d get home from class and not think about it until the next day when I pulled the slippers on my feet.  Last night YouTube taught me that I’ve been a fool.  No one ties those elastic strings into bows.  I’m so ashamed.  It’s like I only took a day of ballet in my entire life.  Wait.  I DID only take a day of ballet in my entire life.  It was a horrible childhood experience.  I don’t want to talk about it.

8. Tie your cinch strings in a square knot (right over left, left over right).  If you tie it in aimage (20) bow people will silently laugh at you for the rest of your life.

9. Pull the strings down toward your toe and cut the excess off at that point.  When wearing your shoes tuck the loose cinch strings under (between the top of your foot and shoe) so you have perfect ballerina feet!

TADA!  I’m telling you … that no bow cinch string thing really through me for a loop.  I’ve been so foolish.


Pass it on:

  • Email
  • Facebook
  • Twitter
  • Pinterest
  • More
  • LinkedIn

Like this:

Like Loading...

Birthday Crown – How-To

27 Tuesday Aug 2013

Posted by wendynewell in Uncategorized

≈ 2 Comments

Tags

birthday crown, crafts, how-to

image (8)I suspect you can take one look at the picture of the birthday crown I made for my friend Paul this weekend and think, “got it … no need to tell me how to make it … pretty self-explanatory.”  Alas that would make for a pretty boring “how-to” blog post.

Let’s start from the beginning.  My friend Leslie sent out an invite for a surprise dinner birthday party for her husband, Paul.  As a good guest I rsvp’d and put the info on my calendar.  What I failed to do is read the invite itself.  I’m pretty good at waiting until the last-minute to do that.  During my Saturday morning walk I went through my closet in my head searching for appropriate dinner attire.  I was thinking we were going to a swanky place in Hollywood so something LBD-ish would be good.  I figured out a couple of options and decided I’d wear the one that was cleanest.  Later in the afternoon I was laying on my bed heavy signing at having to squish into a pair of spanx in a few hours.  It was then I finally decided it was time to read the invite.

image (6)Turns out there was no swanky dinner in Hollywood.  This was actually a family friendly dinner at a BBQ joint/sports bar in Burbank.  I mentally stuffed my spanx back in the drawer and got to work.  The new location offered many more options not only for my limited wardrobe but also for special birthday gifts.

Since I have no money (sigh … someone find me a non-sales job … please) I decided I’d make Paul something special.  A birthday crown seemed like the obvious choice.  Looking at this specific royal head-gear you may be thinking, “what egotistical weirdo would want a picture of himself on his head all night?”  The answer is … everyone I know.  We are all pretty happy with ourselves.  To be honest it’s really a shock we don’t walk around with our favorite picture of ourselves plastered to our forehead at all times.  It’s just who we are.  Since it was Paul’s b-day I thought he had the right to actually do just that.

Here is the obvious how to part:

  • I took an appropriate patterned piece of scrap-booking paper.  Stiff-ish kind.  12 x 12 and cut it in half.
  • I didn’t have time to wait for glue and honestly I didn’t really trust it so I taped the two pieces together.  If you plan ahead you could get some of that colored duct tape and use that.
  • photo (6)Using my head as a template I taped up the other side of the crown.  I was really guessing at the correct size.  I figured his head was bigger than mine so went with that.  If you don’t have your subject right there to fit the crown on as you make it I suggest taking along a pair of scissors and more of your tape (scotch or fancy duct) just in case you need to make some last-minute changes.
  • After printing out a picture of the birthday boy and gluing it to the crown I realized the entire thing was a bit too tall.  Learn from my mistake and cut to the desired crown height before piecing together.  I had to take scissors and cut around the top.  Since I used a blade cutting thing to do other other paper cuts the top was a little uneven and not as nice as it could have been.   Tip:  I printed pictures straight from my subjects Facebook page.  I didn’t have any faith that the quality would be any good but I was wrong.  It worked well and I always figure if I use pictures that they posted then they have already approved it for public viewing!
  • I printed out some “diamonds” and a “Happy Birthday” message on blue scrapbooking paper, cut it all out, and glued it all down (I used normal glue).
  • Finally I had to control myself from covering the entire thing in sparkles.   Since it was for a man I figured he wouldn’t be too happy as pixie dust rained down on him from the sparkly crown on his head.  To give it a little more shine I took some sparkle star paper and made a small strip to decorate the bottom of the crown.

image (7)TA DA!  There you go.  Of course you can go crazy decorating your birthday crown and I highly suggest sparkles for anyone that can handle it!  If you don’t have the same type of friends I do you can always swap out the picture for a number or even a big ol’ diamond.

To finish off Paul’s present I made him a magnet from a family photo (when I gave it to him the glue was dry unlike when I took the picture here).  Unfortunately two of his children aren’t in the picture.  I just couldn’t find one on Facebook with all of them.  I suggest they sit down for a Wendy picture-taking session … STAT!

(Yes I made everyone at the party put the crown on and took a picture of them.  I did miss out on 3 of the kids.  They were in power sugar mode and I couldn’t pin them down long enough!)

Pass it on:

  • Email
  • Facebook
  • Twitter
  • Pinterest
  • More
  • LinkedIn

Like this:

Like Loading...

Hot Head

27 Thursday Jun 2013

Posted by wendynewell in Uncategorized

≈ 2 Comments

Tags

anger, crafts, dogs, dream, funk, Game of Thrones, Glendale, hot head, Petco, Riggins, Trader Joes

You guys … I’m at the end of a very short fuse today and I have no idea why.  Maybe it’s the heat.  Maybe I’m hungry.  Maybe I need a nap.  Who knows.  I just know that I’m getting pissed off at the drop of a hat so everyone better watch out!

It started after I got up early to feed Riggins and went back to sleep.  I had a nightmare that I was employed for this horrible company with a horrible boss (real boss from ions and ions ago).  She was a disaster and off doing who knows what, so I had to take over, but really couldn’t because some of her minions were being moronic and annoying.  Anyway, I had Riggins with me and he would take on anyone who pissed me off (probably due to my reading a few chapters of Game of Thrones before nodding off to sleep — i heart direwolves).  Finally the big wigs of the bigger company that had just acquired us decided my ridiculous boss needed a big ol’ award, and I lost it.  I strolled right up to that big ol’ boss and gave him a piece of my mind!

Upon waking I decided to go see World War Z.  Mostly because Brad Pitt is the dreamy-ist.  I was starving so ducked into a store to get a bagel and ate half before putting the other half in the bag to save for a post movie snack.  Upon entering the theatre I was told I could not bring outside food in.  I tried to explain that I wasn’t going to eat it and planned to purchase popcorn from the theatre but the ticket man would have NONE OF IT.  I really don’t know how I got out of the stand-off.  I think he just knew he needed to back off.  I pushed the bagel bag in my purse, all the while him explaining how that wouldn’t help, and walked past him.  I don’t know what makes me more irate … being told what to do (which I have a strong emotional and primal response against) or horrific customer relations.  Why are movie theatres so bad at customer service?  I find it baffling.  All of them are.  I’ve boycotted almost every theatre in the LA area at least once due to a bad experience.  It seems so easy.  I SO NEED a big movie theatre chain to hire me as the customer service expert to modify and fix their “procedure manual” and train their employees.  By the way I totally ate the other 1/2 of the bagel during the movie out of spite.

On my way home I stopped at Petco to get some Riggins food.  As I was balancing a 25 pound bag of dog food on one hip/arm and grasping a 10 pound treat box in the other arm I was run into, cut off, and fully annoyed by two Glendalians (mother/daughter I assume) who had their itty bitty dogs in individual shopping carts.  Heaven forbid the little darlins’ walk around the dirty ol’ store all on their itsy bitsy own.  The women were the WORST.  Since they made a dash to the check out to get their before me you would think they would be ready to check out.  Oh no …. I stood there with my arms full and aching while they talked and debated and disagreed and then asked the dogs their advice — about purchasing a specific dog treat at check out.  Even the cashier looked at me and rolled his eyes.  Grrrr.

Then I made the mistake of going to Trader Joes in Glendale which is really just asking for it.  Nothing specific happened but I did glare angrily at no less than 5 customers and 1 employee.  You will just have to believe me when I say they deserved it!

photo (9)Sigh … I need to chill out.  “Chillax” as my sister would say.  Well first I have to wash the dishes and go work out.  Then I can sit down and sip on some wine in my newly decorated wine glasses.  Anna came over this weekend to do “crafts” (aka eat cheese and drink wine) and we each designed a set of custom wine glasses (or juice if you are one of Anna’s kids).  Anna expertly put initials on each of hers.  A feat I was in awe of since I have failed every single time I’ve tried this seemingly easy task.  I  put the silhouettes of some of my dog visitors on mine.  I think they all turned out very well! (Directions how in original glass decoration post).  I also have two adorable dogs coming to stay with me starting tonight.   Wine out of a classy glass and cutie pie dogs … that should snap me out of this funk!

Pass it on:

  • Email
  • Facebook
  • Twitter
  • Pinterest
  • More
  • LinkedIn

Like this:

Like Loading...

Personalized Cheers

17 Monday Jun 2013

Posted by wendynewell in Uncategorized

≈ 1 Comment

Tags

Art, crafts, glass, horses, Sunset Ranch

photo (9)This past weekend I attended a bachelorette party and finally got rid of, I mean gifted, the last of my glass art. This also happened to be the first glass I decorated and it showed! It was a disaster of pink glitter, hearts and lace. Although to my credit, that is what it was supposed to be.

The hostess of the party sent me a link to a bride goblet she found online weeks ago and asked if I would make one for our guest of honor. Sure! I screamed. How hard could it be? This is what actually started the decorated glass gifting. I started by putting the bride’s name as well as the word “bride” on the glass but that looked horrible so I took that off (I used fingernail polish remover). This is also the point I learned that the glass marker really doesn’t mark on top of itself very well so my idea of a lovely “mixing of colors” on the stem turned into a bunch of chunky paint blobs. Once almost every inch of the goblet was covered in pink, purple or silver paint, I forced myself to set down the pens and walk away. I treated the glass the same way I did the others I have made.

I NEEDED sparkles. So I did what any intelligent person would do and took a crapload of glitter and mixed it in with some Mod Podge and sponged the beautiful concoction all over the glass yelling, “you can never have enough glitter!” The sparkles really helped class up the glass quite a bit! Once dry I realized that the glitter was on so thick it covered up my carefully constructed paint design. I stuck the glass under some hot water and scrubbed with some dish soap. This caused the Mod Podge to disintegrate (kinda) and with a few swipes of my nail it all came off. I stood over my sink and scrapped off a large amount of the glitter I had so expertly applied earlier. Oddly enough the glue/sparkle mix sticks REALLY well to my sink and it is still sparkly today. One good wash and the sparkles and glitter will come off the glass but, GOOD NEWS, the paint will (should) stay!

I had purchased a good luck charm and attached it to the glass with some appropriately frilly lace ribbon. The charm turns into a bracelet so the bride had a token of the night she could wear post party. THAT is how you make a personalized bridal wine goblet or a set of gaudy and sparkly drinkware! (The other ribbons you see in the picture each had a cowboy themed button on them and we used them to tie around our plastic wine glasses.)

image (10)For the party we took a 2 hour horseback ride through Griffith Park offered by the Sunset Ranch. At the end of the ride you sit down to a super yummy BBQ. Some of the ladies choose to skip the horses and just meet up for chow. The Sunset Ranch folks were beyond nice and took the initiative to separate our group from the bigger riding group so that we had a private horse party with a hunky male guide. We thought it was pretty clever of them to give the hottie to the bachelorette party. Honestly all the guys (and gals) who work at the ranch are hotties so it didn’t really matter who our guide was but I feel like someone somewhere had put some thought into who would lead our group out. Hottie (whose name, I think, is Douglas … but I could be wrong about that … sometimes I’m not the best listener) also played the guitar and sang during dinner which made him even dreamy-er. Hottie scolded me for playing with my phone while I was on horseback when I should have been enjoying the nature of Griffith Park but, I HAD to take pictures to document the event for you and the attendees … plus it was REALLY important for me to post to Facebook while I was up on the hill and had reception … tee hee.

The entire event was a ton of fun and I would suggest it to anyone who visits LA. They have a number of different ride options depending on how much you want to spend and image (7)how long you want to be out. They also have a ride that takes you to a local Mexican restaurant and then you ride back to the ranch. I did this a year or so ago and I like our 2 hour + BBQ ride much better. The other dinner ride is LOOOONNNNNGGGGG (at least for us non horse people) …. For the last 1/2 coming back to the ranch I was practically lying on my horse begging for the ride to be over and then at the end dismounted and laid on the ground for a bit. The 2 hour ride was the PERFECT length and there was no need for me to collapse after. I don’t even hurt today. I give credit for that to Bar Method inner thigh and but work. Thighs of steel I’m telling you!

Happy bachlorette day to our friend Emily (she is the one in the pictures with the pink tank top)!

Pass it on:

  • Email
  • Facebook
  • Twitter
  • Pinterest
  • More
  • LinkedIn

Like this:

Like Loading...

More Crafts

14 Friday Jun 2013

Posted by wendynewell in Uncategorized

≈ 2 Comments

Tags

Art, Asscher, boots, Brobee, crafts, dogs, Riggins, Yo Gabba Gabba

We celebrated my niece and father’s birthday today so I can tell you more about some of the crafts I’ve completed recently.  Get ready to be impressed (tee hee) …

photo (7)Papa’s day – Riggins always gives people presents.  I use to think long and hard about which gift to put his name on for fear he was the giver of the more impressive present.  Then I realized that the recipient was probably smart enough to figure out that Riggins didn’t really get on Amazon, place the item in his shopping cart, get it delivered, and wrap it.  For dad’s day I made my father a giant (really heavy — too heavy really but it was all I could find for the right $ amount I was willing to spend) tea mug.  I was lucky enough to find a silhouette online of a dog and a man who could pass for my dad and Riggins.  I used the same method I did with the glasses in my past post.  I told you more people would be receiving decorated glass gifts!

image (9)Brobee head – My niece is OBSESSED with Yo Gabba Gabba.  She loves them all and now tends to lean toward Foofa as her favorite, but for a long time Brobee was her main man.  I decided she needed a Brobee headband.  To be honest the headband itself is a little big but beggars can’t be choosers.  I took some red felt, cut it into 3 squaty triangles, sewed each triangle together, stuffed each one with felt scraps, glued them to the headband, and then sewed the bottom of the triangles together for good measure.  TADA!  BROBEE HEAD!  She liked it but was just as happy to have her Mom wear it.  Clover was nice enough to model it for you while she was here.

image (8)Cowboy Boots – I read on Facebook that my girlfriend’s son, Gavin, had a cowboy theme day at his school/day camp today.  I LOVE dress up days.  Those are always the best.  I offered to make him some fake cowboy boots if she brought over the material.  To make these I took one square (well rectangle) of brown felt and cut it in 1/2.  I sewed the back together then used one of Gavin’s shoes to cut the top to fit.   Next, I sewed the top together.  For the “leg sleeves” I took two more pieces of felt and sewed them together then grabbed my cowboy boots as a template and cut the top in the cowboy shape.  I put velcro on the back of the “leg sleeves” for easy on and off action.  Finally I grabbed a brown sharpie and faked a cowboy boot pattern.  Of course you can put a piece of elastic under the shoe part to help it stay on and even safety-pin the sleeve to the shoe cover to keep it in place.  I think they turned out pretty sharp and I’m told Gavin was happy with them, which is really all that matters.

Just because I like you I’m going to leave you with this adorable picture of my niece and nephew safely eating their cookies in a location Riggins and Asscher couldn’t get to!   Have a wonderful weekend!image (33)

Pass it on:

  • Email
  • Facebook
  • Twitter
  • Pinterest
  • More
  • LinkedIn

Like this:

Like Loading...

Most Recent Popular Posts:

  • Holiday Cheer!
  • The Active Pack Hikes
  • When Riggins is Booked or Unavailable
  • Hi!
  • The Best Mardi Gras Masks

Enter your email address to subscribe to this blog and receive notifications of new posts by email.

Join 1,112 other subscribers

Wendy’s Twitter Feed

  • Eternity A507064 is available for adoption at the @PasadenaHumane. #pasadenahumane #adoptdontshop #adoptadog https://t.co/ZDoyAsJKKI 8 hours ago
  • Violet A507247 is available for adoption at the @PasadenaHumane. #pasadenahumane #AdoptDontShop #adoptadog https://t.co/UnLJk6MroR 8 hours ago
  • Robaire A506272 is available for adoption at the @PasadenaHumane #pasadenahumane #AdoptDontShop #adoptadog https://t.co/ulOMNeFMpl 8 hours ago
  • @RitaPanahi https://t.co/MO8Mnep3Ri 15 hours ago
  • @frozehappy @catturd2 No 16 hours ago
Follow @WendyNewell
Follow Me Myself & Riggins on WordPress.com

Wendy's Instagram (@wnewell)

No Instagram images were found.

Archives

Create a free website or blog at WordPress.com.

Privacy & Cookies: This site uses cookies. By continuing to use this website, you agree to their use.
To find out more, including how to control cookies, see here: Cookie Policy
  • Follow Following
    • Me Myself & Riggins
    • Join 155 other followers
    • Already have a WordPress.com account? Log in now.
    • Me Myself & Riggins
    • Customize
    • Follow Following
    • Sign up
    • Log in
    • Report this content
    • View site in Reader
    • Manage subscriptions
    • Collapse this bar
 

Loading Comments...
 

    %d bloggers like this: